Project "Barn Bird" Reply #30 – October 04, 2013, 10:45:18 PM Yep she is slowly but surely. Tomorrow Im going to attempt to clean and deodorize the carpet and pressure washing the motor and engine bay. Im taking my sandblaster out to to prep the motor and hardparts like the axle for some fresh coatings!! Ill do more if time allows tomorrow. Quote Selected
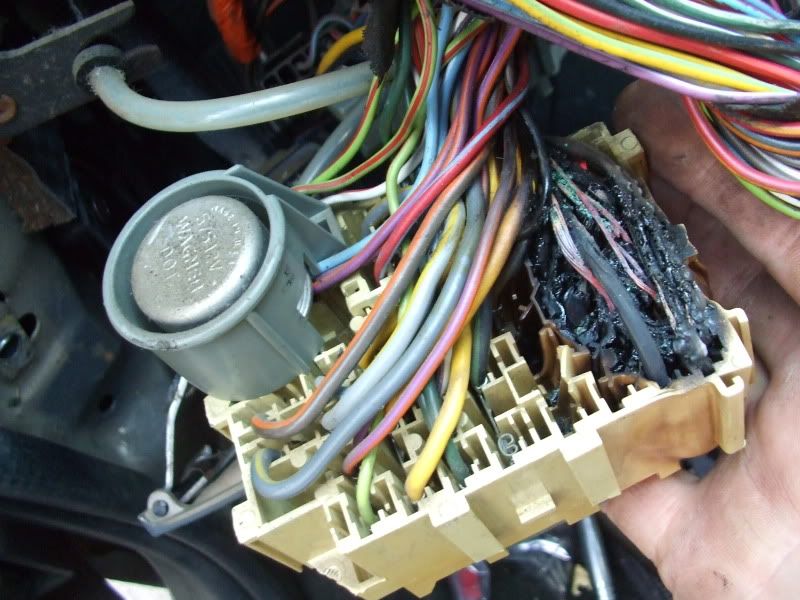
Project "Barn Bird" Reply #31 – October 05, 2013, 10:31:33 PM Feel like I got alot done today!! 5 speed pedals and master/slave are installed, just trying to figure out where the other looped piece of harness for the clutch safety switch is. Discovered why there was a toggle switch installed in the car to, that eventually melted. Hence the reason for all the extra pieces of dash in the trunk. The multifunction switch apparently got to hot and melted the plug and part of the switch it self. Luckily pulled the switch off the other column and am looking for a pigtail to fix the plug. Also gonna have to rewire the headlights as they spliced into it to feed the power to the headlights, gonna be doing relays to kill 2 birds with 1 stone. So far thats the only wiring damage found in the entire car. Pics of the 5 speed swap parts installedFully cleaned engine bayRear deck cover is ruined though, apparently the mice decided that this was the best place for the bathroom. Its basicly falling apart. Hopefully Vinnie can come thru with one for meI was able to save all the carpets! They came clean and smell good even!! They are both drying right now over some things so no pics of them. Now a quick question for all one want to give me some advise. The plastic cover in the pic below, has anyone removed them or should I just take the insulation off. I believe I do have some smell still coming from them as there was mice nests between them and the interior sail panels. Quote Selected
Project "Barn Bird" Reply #32 – October 06, 2013, 09:34:16 AM Believe me....I understand melted wiring !!!.....and that doesn't include the harness above the headliner, harness under the carpet, and trunk wiring that fried. what a of an ordeal that was. Quote Selected
Project "Barn Bird" Reply #33 – October 06, 2013, 10:05:47 AM Ouch, glad mine aint that bad. Luckily Ive had a battery hooked up and no smoke!!! Hopefully no one has ruined the deck cover out of that bird you found, I really need it!!! Quote Selected
Project "Barn Bird" Reply #34 – October 06, 2013, 09:28:37 PM More work going on!!! Finally found the other pigtail for the clutch switch, it was hiding up behind the headlight switch. Lots more cleaning done today, seems like its never ending!! Removed the cluster to do some cleaning and checking to make sure there was no nests hiding behind it. Got a VAM cleaned and put a coat of paint on it to make it look nice. Then the fun began, decided to get the new 3G alternator mounted on the motor. Downside its a bigger body/mounting, upside Ive got a gutted and 90* rotated upper so I was going to have to do something anyways. So I decided to set the motor in the car, so I can mock it up properly. That was interestingly in it self, by my self!! Before I start making brackets to secure the alternator I need to bring the rotated upper out so Im not setting it out to far. As it looks now Im going to need to find a new mounting location for my power steering resevior. Dropped in the car and using a tire iron to mock a possible bracket. And yes I know Ill need to get a longer belt.Heres a pic of how the cars sitting with the motor dropped in, sitting a little lower in the front!! Still got the weight of the trans and bellhousing to add. Quote Selected
Project "Barn Bird" Reply #35 – October 09, 2013, 12:06:33 AM Im sick with Bronchitis so progress is gonna be slowed a bit til I toss it completely. Did decide it wasnt gonna hurt to do some work today. Took my rotated upper out and started to fab up one bracket for the Alternator. When to do a practice close of the hood and Ive got hood interference with the intake. I kept the highest edge of the alt. below the intake just for this reason. Either I dont have the motor sitting quite right or something was messed up with the upper by the person that rotated it. Quote Selected
Project "Barn Bird" Reply #36 – October 09, 2013, 03:49:02 PM Is the intake hitting the hood scoops? Quote Selected
Project "Barn Bird" Reply #37 – October 09, 2013, 10:46:23 PM Its actually hitting either the ducting or the hood itself. 2 options are a cowl hood or have the upper intake remodded correctly. Found out most take a pie piece section out of them to shorten them and give the throttle body a downward slope. Quote Selected
Project "Barn Bird" Reply #38 – October 10, 2013, 05:10:24 PM Hmm that might work. I swear that the intake on my Thunderbird sticks up above the fender a bit. The hood still closes fine. Quote Selected
Project "Barn Bird" Reply #39 – October 10, 2013, 09:54:09 PM I think it may actually be hitting the ducting for the scoops. Cant remove that or the hole motor will be directly exposed, besides that once I got the front mount hooked up the air coming in the scoops will actually be directed over the turbo/exhaust manifold. Hopefully keeping the temps down some.A 3rd option surfaced to, all of these thanks to the turboford boys, is to make an angled adapter as it is the TB thatshiznitting and not the actual upper intake. Hopefully this weekend will be fruitfull and I can get this figured out. I need to yank the motor back out as some of the parts on it are going to be powder coated!!! Quote Selected
Project "Barn Bird" Reply #40 – October 11, 2013, 02:01:57 AM Well boredom hit tonight as I was just sitting here. Noticed some fuzzy spots on the instrument cluster that wouldnt come off as I brought it home to clean it fully. So I decided what the hell, Ill use my headlight kit on it. cleaned right up and shines like new!!! Quote Selected
Project "Barn Bird" Reply #41 – October 11, 2013, 10:50:17 PM Got off work early today so I decided to take another stab at getting the mouse smell out of the car body. Buddy suggested pressure washing it! Low and behold the color of the water coming out at first scared me!!! Brownish Yellowish!!!! Pressure washed it not once but twice, second time around the water coming off stuff was alot cleaner. Toweled everything down to get standing water out and let it dry while I ran some errands. Came back and sure enough it smelled 100X's better. In the process of washing the inside down I also decided to finish other pieces of the interior!!! Carpets have been done for a week I was just letting them dry all the way! All seats were targeted today and I must say they look a hell of a lot better now!!!Decided to lay the carpets down as they were slightly getting out of shape from the washing. May start putting some of the interior back together, especially if it doesnt get in the way for something that needs to be done later. The alternators new home has been officially decided since things have been figured out with the hood interference problem. Im going to be making a slightly turned down tube that will keep the TB lower than the hood and still face forward for the front mount. You can also see my redneck brace bracket, Im probably not 100% done with it but it places it so I can get the rest lined up. Then the motor can come back out for some new seals and some cleaned and PC'd parts. Quote Selected
Project "Barn Bird" Reply #42 – October 12, 2013, 11:50:50 PM First thought for today was to get putting some of the interior back together, which did end up happening but after a buddy and I noticed something while looking at the rear bumper. The entire center was pushed in, hard to tell how much exactly but as of the time I left for the night it was just about better than it was from the factory. It almost looks like it had been involved in a light fender bender and the damage was covered up. Considering the taillights have yard paint pen on the bottoms of them. But a couple hours later, some muscle and some well place hits and tack welds and I do believe its just about good. Best surprise of the day though is, the center of the rear bumper had been pushed down making it look bent. Even though it was just sitting on the reinforcement. Pulled the cover off with the straightening and notice the metal brace was bent to shiznit. Flipped the cover and straightened it to, but the pushed down in the center was still there. Looked at my buddy and siad we need heat!! Borrowed my Sister-in-laws hair dryer figuring it wouldnt work, low and behold it actually got the urethane just hot enough to let it relax so that the bumper could go back to its original shape. The boards in the pics are actually pushing up on the parts of the bumper that were pushed down. We had just heated the whole back when I took the pics with them under the car yet. Did attempt to start on the interior!!Ended the night on an interior note!! Quote Selected
Project "Barn Bird" Reply #43 – October 13, 2013, 02:19:23 AM Nice car so far. You're going to cry, but I tossed a set of nice door panels, two sets of arm rests, and a minty rear package shelf not too long ago that I had ded for my old blue bird. Quote Selected
Project "Barn Bird" Reply #44 – October 13, 2013, 02:25:16 AM Thanks John and I may just cry too!!! LOL Thats actually all parts that would have come in handy! My biggy right now though is a headliner or atleast a good strong backer to re-cover. Thought I could save the original, but as I tryed to peel the fabric off it showed its true colors. It was starting to come apart. Quote Selected