For lifting and installing the engine, I recommend to build the "adjustable engine load leveler". It will make the work much easier, especially when you work alone. Easy to build and here is mine.
Thanks Jerry :) Now I have main measurements to make tank supports and I guess how tank straps are fixed to supports :)
About spare wheel. I have small size type spare. Whether the rod with hook looks like this ?
Anyway, I would like to order from you some extra pictures for me :D when your tank is supported and how your spare wheel is fixed (when trunk is complete)
Thank you all very much ,for good words, your moral support and encourage me to continue :) :) I myself wish, that I have skills to use my E-wheel correctly. Making panels for sell.... oh no, loooong way to go. Not so much quality All restoring progress is slow, I take this like a learning experience and I try to make the repairs invisible as possible. This time I also tried to use flexible shape patterns for making correct pieces. As you see, not much success. Pieces are not perfect but at least more or less acceptable.
this piece is waiting about to make fuel tank supports
fuel tank support are totally rusted and I even don´t know how originally are fixed to tank supports those metal stripes, which are under the tank :(
as compared to other pieces, this was easy to make
My welding gas was ended and I used flux core wire for temporary tack weld.
I have also some questions. I can´t remember, which part was fixed to bracket nr1 on picture? I cut it out. Must I restore it ? If I remember correctly, then bracket nr2 is for fixing the spare wheel?
Hello :) Long time have been quiet here. The "evolution" of the project has been very very slow. I still in "Stone Age" but daminc is very close to nowadays During winter, in the heated room, I strengthen my English wheel frame but mostly there was a lot of work with lathe and here is the result:
my "Army of rollers" :) (rollers are hardened)
Some tests
Also I made little sheet bending device and device for pressing grooves to the floor panels with my hydraulic press.
Here is my first repair test. Curves formed by English wheel.
Now, in summertime I hope accelerate "evolution" and make updates here more often.
So here's the weird dip in the panel. Not sure how or why it did that. but at least it's in and not popping out.
I guess it maybe caused by heating stress of welding. Maybe you did your weldings too long distance continuously and metal was overheated. But strange thing is that usually sheet will expand outward. Maybe this caused because you use backing strip to weld panels. When it cools down after welding it will constringe and bends sheet down. Of course now is too late and I am sorry if you already know this and did it this way, but I would like quote Randy Ferguson (http://www.fergusoncoachbuilding.com/):
Quote
You have to weld thin gauge sheetmetal much differently than you would heavier plate, even in the 1/8" range. You must weld a series of spot welds, with each one overlapping the last. I try to overlap by a 1/3 to 1/2 on each successive weld. You will also need to stop at regular intervals (not more than an inch) and stretch that area out before moving on, otherwise, it will have more distortion than you care to deal with. You start by placing tack welds at 1" intervals to keep the two pieces in good alignment. (I'm only assuming you're butt welding, at this point.) You can then start the welding process. I prefer to start in the center of the seam and work out both directions toward the edge. You must stop and work the weld as you go though. To best do this, a 1/16" cut-off wheel works great for knocking down the proud weld bead. You want to leave just a tiny amount of weld above the surface, because you're going to work this down some as you hammer the weld to stretch the metal back out. You only work within the Heat Affected Zone or HAZ as we often refer to. This is the blued area around the weld. Do not leave the area when stretching a weld. Even though the surrounding area is distorted, it is still unharmed. It's just sucked in down some when the metal shrunk along the HAZ. It will pop right back into place when you stretch the weld seam. You stretch it by hammering on dolly, in other words, you place a dolly on the backside of your weld and hit it with a hammer, making sure your hammer blows are against the dolly (or post dolly if you have one) This will rapidly stretch the area drawn in by the heat and relieve the panel of the stress caused by the heat, removing the warpage. You can now add another series of adjoining spots and continue the process, jumping back and forth from side to side, working ever closer to the edges of the panel until finished. Once you've gotten the weld completed, you can go back and fine tune the weld seam work the panel with a slapper and dolly, producing a very smooth panel. I prefer to use a file to work down the final few thousandths of proud weld, rather than a grinder that will remove too much material. A shrinking disc will come in real handy too, to shrink any areas that you overstretch.
Sorry about long-time silence in this thread. I must confess, that nothing notable wasnt happened. Shame on me :) The project is on standby. I changed my "conception" about bending and processing of sheet metal. However I decided to build a classic english wheel and use it also for sheet bending.
It have rubber and steel upper wheels.
Same system for bending, like with hydraulic press.
Also I bought some books and dvd for learning.
Now I training how to process sheet metal and same time I continue to making lower rolls with different profile for my english wheel. In winter I cant work with my project often, because my garage have some weak heating only in one room. Another room is cold and there my car stands. At least in spring I will continue working with my project more faster.
Hello again :) Little update. During my last short vacation days I did with my car nothing, but I did something for it :) I started build roll workbench for making various grooves into floor sheets with various profile and width and maybe even some bendings on edge of sheet. My skills working with lathe are poor and I fail with five rolls and just wasted material and time. After all I made one and half set of rolls with one profile and I get opportunity to try whether my idea will work at all.
Idea is simple. I will use bench from my hydraulic press.
For making different grooves with different blendings I will use different rolls in different positions. With two rolls I make the basic groove into sheet.
and if a sheet will warped or I need grooves with blendings, then I use three rolls.
Now putting a sheet between the rolls and adding little pressure with jack. Then moving sheet by hand forwards and backwards. Again little more pressure with jack and again forwards and backwards. And again and again. It will take a lot of time. Of course if you are strong, you may do it with only one pressure adding :) My bench is not also fixed to floor. Also be very carefully with edges of sheets!! They are nastily sharp. I broke two pairs of gloves and my hands also.
Beginning process:
Ending process:
After firsts experiments I may say that the idea works and results are here.
The profile is not exactly same as original but at least acceptable.
Btw, using bolts and nuts on rollers shafts is temporary. There will be shafts from correct material. Also this rusted sheet I found only for experimentations. Building and experimentation will be continued :)
Yes I found it and big thanks to you for advice :) Before it really was my problem with welding thinner sheet. After some experiments with unnecessary sheets, I found correct welder machine settings for thinner and thicker sheet and those weldings of frames are made with 0,23" wire also :)
I am SO glad we don't have to worry about rust here in Oklahoma.
Yeahh!! Happy people !! :) :)
Now summary what I did so far? Repairing middle part of left rear frame. But at first how my car is looking at the moment. One day, when I cleared my garage, I showed little bit sunshine to my cat :)
For rust removing I use sandblaster and here is my temporary chamber.
Sandbalsted and coated with rust inhibitor (50% dilution of orthophosphoric acid). Btw, white color shows that I made dilution too strong and it musted be moisted with water again or brushed away. I knew that I will do cutting and welding works and will be brush it away anyway. So I left it like it was.
Making curves and grinding off excessive weldings.
Then piece by piece moved forward
Welded from both sides.
From outside excessive weldings grinded off. Only for good looking. Maybe somebody will be see it :) And for my peace of mind :) Then temporary painted with zinc spray.
Inside painted with 2K primer.
Later I plan paint inside of frames with 2K paint for painting boats and ships underwater section.
What is Your plan with those exessive parts of old floor ? There is rather big gap between sheets. Only sealing, weld edges from underneath and sealing or cut exessive part and sealing ? Without seam sealing rust will come inside from here.
Hey to everybody ! I started this thread beside daminc-s project because sometimes I need Your advice or help and same time to show You what I have done :) My overview is not so thorough as daminc-s, but at least something :) At first I am sorry if my english grammar is not correct. It is not my native language and frequently I use dictionary. Here is my project Cougar LS 1986 V6 3,8ltr. I started it already a year ago. Project progress is very slow, because I dont have much time for it. My working schedule enables working with my project only two weeks in month. During those duty free weeks also the family and other thousands things demainds time also. In last summer I started disassemble of car, then I built car body rotisserie and then new room for car and oops!!, summer was ended :( My garage dont have heating and in winter I did inside room works. I rebuilded engine and transmission.
In this spring.
During disassembling I understood that car needs much more body work then I hoped :mad: Some samples:
Floor (seems on pictures better then in reallity)
Fuel tank supporting
Driver side rocker panel
Wheel well openings
Lower parts of rear fenders. Both sides.
Air suction of heater-conditioner blower
Rear subframes
And hundreds little places more :) :(
So, for using body rotisserie, I must at first repair boby framework. Here I repaired part of left rear subframe. To get better access I removed rear panel.
Some pictures about repairing.
After removing all floor isolation (pitch?) mats, I found a lot of work is waiting me Left side trunk and subframe
Same story on right side plus trunk bottom.
Floor under rear passengers.
Now the body is almost empty. Glasses, steering and so on are removed, except front and rear suspension components and crossmembers, brake calipers, lines and hoses. For example about progress slow. I expend 3 hours to remove 2 (from 4) rear seatbelts fixing bolts. One week I wet every day the bolts and trying lose them. Nothing. Then heating and beating, heating and beating again and again. Result here:
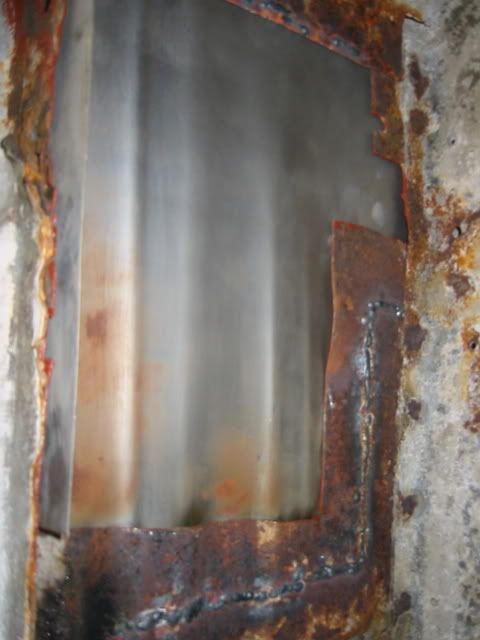
Now my questions starts :) About rear left subframe. Inside are two connections (another is hidden on pic) between subframe walls, it also going on bottom of frame and it has two nuts connected to nowhere. It is like double frame inside. For what is it ?? At first I thought that it is for strengthing frame. But this "inside frame" was welded to "main frame" only with some buttweldings and was removed rather easely. Must I restore this "inside frame" or not ???
I use the smallest diameter wire. .023 is great for sheetmetal with the gas.
I myself have a problem welding anything thicker than 18 ga.
I'd love to see more pics of your project too.
you can also build your own metal bending brake. I think I may have a plan for one too.
Thanks for reply! I use 0,031" wire and maybe it is my first problem. On 1-st step of settings a weld stays like mountain and on 2-nd it burns through. I will try with smaller diameter wire.
For me is vice versa, with thicker material I weld better :)
To be honest I must confess, that for bending subframe I built hydraulic bending brake :) Similar like on HAVI-s link. Why I didnt saw this link earlier, they have way better design then mine :(
With wood blocks I bend sheet up to 16ga. I also plan to build a metal bending brake. If You find some good drawings, can You share them with me ?
I have many pictures of my project, but at moment most of them are about disassembling. I try make them as many as possible because I know my project will progress slowly and later I definately will forgot how to assemble all back. Maybe I will made new topic beside Your "Evolution Project"
Yes I do, but not very well. I have this welding machine. Gas is Ar+CO2 With material 2mm and more (14 and less gauge?) no problem, but like car body panels 1mm (20 gauge) thikness, I have sometime some problems. I think it is because my welding machine have current regulating with switch not by potentiometer. I think I need just more practice :) Bigger problem is sheet metal bending. Some pictures what I did last on my cougar. Rear subframe repair.
And here is little example, how I mostly bend sheet :)